Learning
Compression

|
|
Audio Learning Compression |
|
|
|
|
|||
|
   |
|
COMPRESSION Compression attenuates the signal that goes beyond a certain threshold. It's in a certain manner a sort of automatic control of the level. As it is often difficult to adjust the volume of a voice or an instrument which level continually fluctuate and to make it perfectly hearable during all the song, using a compression can play, till a certain point, this part of automatic control of the volume. To have a better idea about it, let's take as an example a voice recording where, on a scale graduated from 1 to 10, the lowest level would be 1 and the highest one would be 10. When compressing all that is at the top of the level 6 at 50% (so between 6 and 10), the lowest level will still be at 1 but the highest one will be from now on at 8. Thus, the fluctuation of the recording level will be from now on between 1 and 8 instead of 1 to 10. The global recording level can then be increased by 2, as a result a fluctuation of the level between 3 and 10. It will be then easy to hear the lowest parts of the recording. When reducing the fluctuation of the level, it is much easier to adjust the suitable level of the volume. Applying some compression directly when recording make it possible to reach a higher recording level. But it can also deteriorate in a way irreversible the original quality of the take. Thus, to be used carefully when recording. How does it work ?
Small recall : in the digital recording domain, sound is measured in decibel (dB), 0 dB being the maximum level. Thus, -1 dB is higher than -2 dB. THRESHOLD : This button is used for adjust from what level the sound will be compressed. This setting is relative to the recording level. If it is a high recording, we will adjust between -2 dB and -10 dB. If the recording is low, we will set beyond -10 dB. However, all of this depends on what the sound-engineer wants to have as an effect. It must be kept in mind that compression is here to attenuate the peaks. The role of the threshold is mainly to determinate the frontier line between the too much high peaks and the remainder. As a picture is worth thousand words, let's have a look to the picture 1. We could see a part of recording which maximum level is at 0 dB. The threshold (dotted line) being adjusted at -4 dB, only the portion of sound located above -4 dB will be processed. 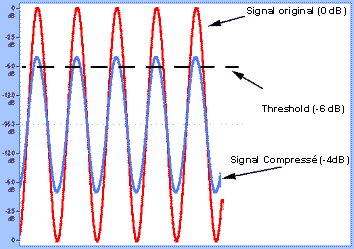 RATIO : It's with this button that you adjust how much will be compressed the sound. A setting of 2:1 significate that an incoming signal that goes beyond 2 decibels from the "threshold" (-12 dB in our example) will be compressed by (2dB of outrun/Ratio of 2) 1 dB in output. ATTACK : With the Attack, you decide how much time will take the compression to be completely effective. This adjustement is important because some sounds have a much faster attack than others. As an example, the attack of a stick on a snare is much faster than the one of a bow on a violin. This parameter should'nt be taken with lightness because the attack is the most determining component of a sound in the perception of this one by the ear. Let's take a sound which attack lenght 15 milliseconds (ms). If "Attack" is adjusted at 5 ms, the compression will be completely effective before the sound attack finish and the result shouldn't eventually sound natural. On the other hand, if we adjust "Attack" at 20 ms, the compressor will be progressively effective till 20 ms so that the attack won't be totally compressed when it will finish. The part of the sound that is after 20 ms will be progressively "uncompressed" during the period of the "Release" as soon as it will be under the "threshold". An adjustement of 10-15 ms is a good point of departure for the setting of the attack. RELEASE : There, you adjust how much time will take the sound to come back to a normal situation, as soon as it will get down under the threshold. If the time is too short, the sound will come back too quickly to the original level, that will give as a result an effect of "pumping". On the other hand, if this time is too long, the compressor may have no time to come back to the original level before an other sound will go beyond the "threshold". As a result, an incorrect compression. An adjustement between 100 ms and 400 ms is a good point of departure. How should a sound look like before and after a compression :
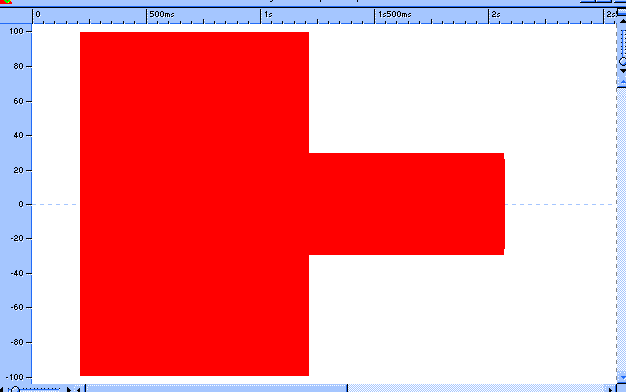
No compression
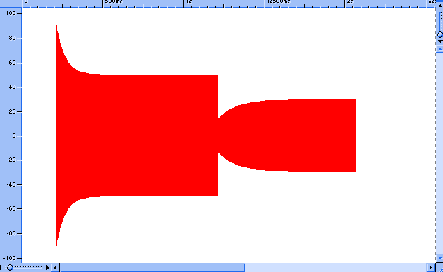
A lot of compression ! KNEE : You can adjust with this control how will act the compression. "Soft Knee" gives a scaled compression while "Hard Knee" gives an immediate compression. OUTPUT : As we have compressed the sound, we should want to compensate this loss of volume by increasing the output level. ?subject=About Compression">Gilles BLAIS |
|
|
|
| Contact us | Being informed of updates |
|
|
|
| © COPYRIGHT : graphics, design of and texts contained on this site are the ownership of their respective authors. They cannot be copied, duplicated or reproduced without our prior formal consent. Translation into english : Daino | |