


Cubase SX Tips and Tricks #1

Those tips and tricks were first written for Keyboards / Home Studio magazine. They are published here with their kind permission, thanks ,o)
 The
Inspector has been seriously rewritten, it is possible now to display
all the parameters of the mixboard, everything can be managed from the "Project"
window. Not too bad, would you say ? Yes, but there's something better
!
The
Inspector has been seriously rewritten, it is possible now to display
all the parameters of the mixboard, everything can be managed from the "Project"
window. Not too bad, would you say ? Yes, but there's something better
!
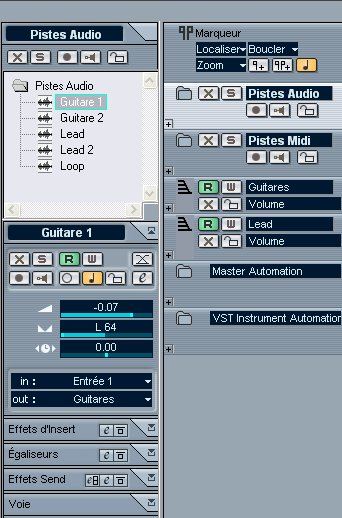
In a project, add a "Folder" track in which you will drop some
Audio tracks, for example. Select now the "Folder" track. Hullo,
a little exploration window is appearing, at the top of the Inspector,
which lists all the tracks contained in the Folder. Well ! In this explorer,
click on one of these tracks... in order to make appear all the Inspector
interface of this track. And here you are, you have at your disposal,
in a simple navigation system, the Inspector for each track of the selected
Folder.
You would say to me : what's the convenience since you can have the same thing by clicking on the Audio track itself ? Good question, to which I will reply this : a project can quickly contain a large number of diversified tracks, so that you would be obliged to make a lot of vertical rounds between the Project tracks. Using "Folder" tracks becames essential for having a minimum of organisation on one hand, and on the other hand to gain some better visibility. It is so extremely useful to be able to close the "Folder" tracks in order to mask the contained tracks, when keeping a direct access to the tracks adjustments, and this can be possible thanks to that trick.
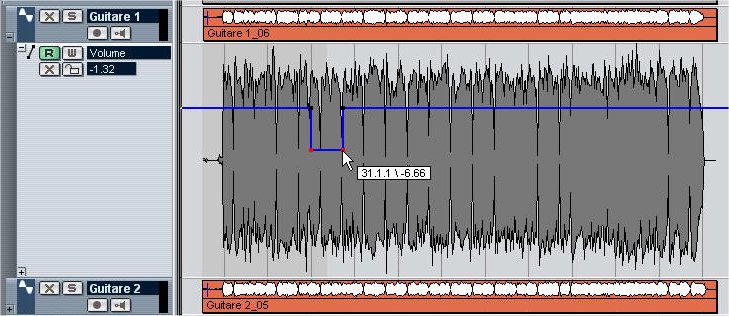
Among the SX major improvements, there is of course the illimited undo/redo, but I will put in second place the rewrite of the automation. Here's a trick that will be daily useful to you ! Let's consider an example, you have an Audio track which volume is at -1 dB, but which must lower to -5 dB from measure 21 to measure 35. You probably know how to create an automation : click on the small "+" of the track to be modified, click on the "R" if it isn't green to activate the automation for this track, creation of automation points simply by clicking on the blue line on the desired spots and by putting them where you want.Let's imagine that finally, you want to lower the volume at -7 dB, how to be sure that the two automation points will be moved similarly, in the same ratio ? You just need to manipulate them at the same time, with only one mouse move ! Select the two automation points to be modified when pushing the 'Shift" key, they became red, so they are both selected. All you have to do now is to move them towards the -7 dB with the self-confidence that they will have at last the same value !
As we are talking about automation, here's a trick a little bit crazy but that I appreciate particularly... But beware, this trick functions only if you have loaded a soundbank (so, several instruments, .fxb files) in your VSTi.
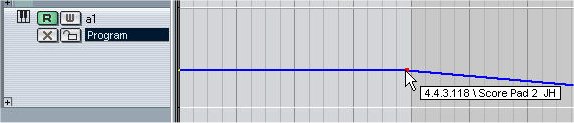
Open the plugin interface and click on the "W" to change it to red, and click again immediately on it to turn it off..., yes, yes ! Look now at your "project" window, a "Vst Instruments Automation" folder has been added, if it didn't already exist, with a track dedicated to your VSTi. Click on the "R" to set it green and choose in the small black square the "Program" parameter. As a result : when creating an automation point, destinated thus to use an other sound (program) during the playback, you will see a tooltip appearing which will contain your layer position and especially... the selected program name ! It makes it possible to create some "Program Change" very easily by using simply the program name. Amazing, no ?
See ya soon, here or somewhere else...