


Cubase SX Tips and tricks #11

Those tips and tricks were first written for Keyboards / Home Studio magazine. They are published here with their kind permission, thanks ,o)
Manipulating several Faders, bis !
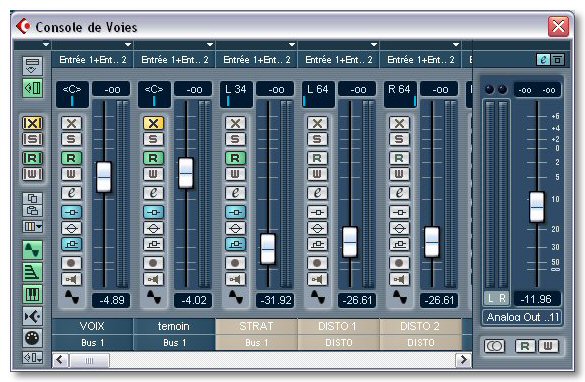
In our fourth chapter, we saw how to « Link Channel Strips » of the
mixboard in order to manipulate their Faders at the same time. There's another
solution !
Open the mixboard (F3) and select the channel strips one by one by
clicking on their name and holding the Shift key.
The Faders can now be moved up or down simultaneously by using
the arrow keys « Up » and « Down ». Simple, but it kills ! In the
same series, it is possible to navigate from channel strip to channel strip with the
Left/Right arrow keys and to adjust the volume of the track with the Up/Down arrow keys.
Fine Adjustments in the mixboard
As we are talking about the mixboard, two very useful little tricks :
- CTRL + Click on a button or a fader resets the adjustment to its initial value, that is to say zero, in general.
- Manipulating a Fader or a button while holding down the ALT key allows to make a very precise adjustment of the value.
Playing a selection in loop
 You could have to work with a loop on a well-defined section of a song in order to, for
example, add some notes at each cycle (if, like me, you don't have a gift for playing keyboards !)
without wishing to set a marker or to move the locators. So, hum, how can you do that ?
You could have to work with a loop on a well-defined section of a song in order to, for
example, add some notes at each cycle (if, like me, you don't have a gift for playing keyboards !)
without wishing to set a marker or to move the locators. So, hum, how can you do that ?
Easy : with the « Range Selection », tool, erm, select the
part you want to loop. Then, do a right click on the
selection and follow « Transport / Loop Selection ».
As finding an option in a menu or worse in a submenu is getting more and more
fastidious, it will be probably judicious to attribuate a shortcut to this function.
Oops ! My own fault, the shortcut is already programed : SHIFT +
G ! ALT + Space will make the selection played once.
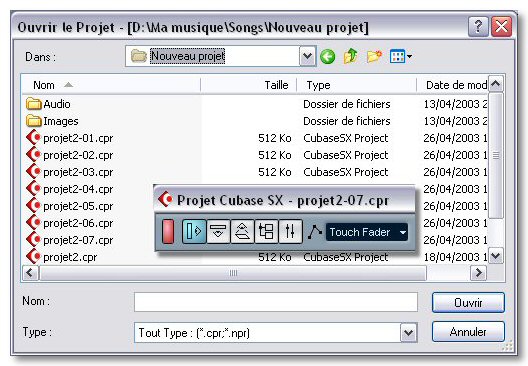
Incremental savings
Saving regularly the Project during a session, that's good, but having
different savings at different stages of progress in the project, that's better !
Rather than doing a CTRL + S during the work, do CTRL + ALT +
S. Cubase will then save your work while adding a number at the end of each file name,
01, then 02 etc. If in the following days you notice that
your inspiration has gone to a dead end, you will be able then to
return to a precise point in the process. Fairly nice, isn't ?
Selection of Midi Outputs
Example : you got a superb arrangement from the Web in GM format and
you want to work on it in Cubase. Easy, File menu then Import /
Midi File. You have thus normally several Midi tracks.
But ! They aren't directed towards any output. To avoid to have to choose
the output track after track, do it for one of them but by holding
the CTRL key down. The output will be automatically set to all the
Midi tracks of the « Project ». To be note that this works for some other parameters
like Midi channel, Midi input, etc. The same thing for Audio tracks. One
regret : to not be able to use this trick on the selected tracks only...
See ya soon, here or somewhere else ,o)