


Cubase SX Tips and tricks #12

Those tips and tricks were first written for Keyboards / Home Studio magazine. They are published here with their kind authorization, thanks ,o)
Editing Events
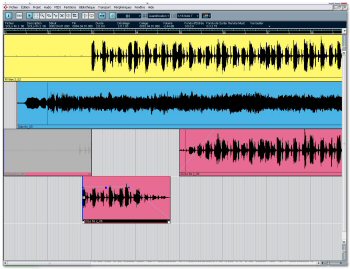 This function was available in VST and it does exist in SX, but there's
a shade of meaning to be well assimilated. The aim is to have at your disposal several Events in
a single window in order to manipulate them and to create an editing.
This function was available in VST and it does exist in SX, but there's
a shade of meaning to be well assimilated. The aim is to have at your disposal several Events in
a single window in order to manipulate them and to create an editing.
Once again, let's recall that an Event is a graphic drawing on the
screen refering to an Audio file and telling Cubase which
file must be read and when... A Part is a "container" with
one or several Events.
When you record a blank track, you create Events.
Now, the editing can be done within Parts only. As a conclusion, you first have to convert
all the Events into Parts in order to be able to manipulate them.
Practical exercises !
Select the Events to be edited. Do a right-click and choose « Audio / Events To Part ». Then, do CTRL + E, which will open
the Audio Part Editor. The Events are multi-layered, all you have to do is
moving them, cutting them, muting them, applying effects upon them, etc.
Calculating a loop tempo
Eternal difficulty : using a drum loop of which you don't know the tempo. In order to get round this trap, you will have recourse to a tool already detailed in our chapters # 2 and 9 : the Hitpoints.
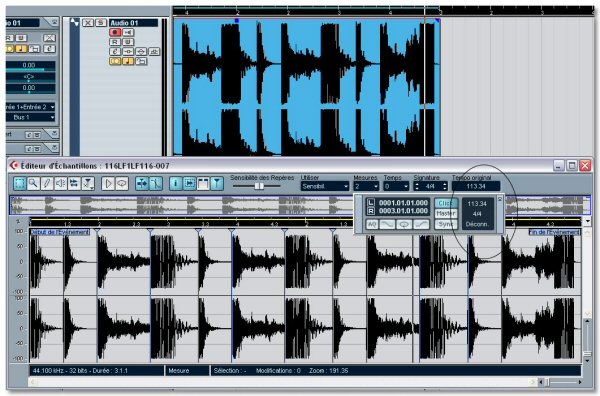
Once the sample is imported, select it in the Project and hit the P key in order to place the locators at the starting and at the end of the Event. Are you
all right ? So, double-click on the Event to open the Sample Editor. Then, activate the Hitpoint mode button (the goblet without a foot, isn't it !).
After making sure that the Use parameter is well set on Sensitivity, use the small slider located on the left to get markers on peak bars.
Then tell Cubase how many bars the loop is long and the
key signature. The time must be set to zero (too long to explain here ;op). Consider
now the Tempo box, it indicates the loop's one ! Modify the tempo of the Project in consequence and have a look to your locators : the right locator is located very
precisely on the 3rd bar whereas my sample only contained 2 bars originally !
Several parameter groups in the Inspector
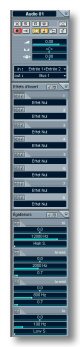 By default, the Inspector displays only a single parameter group at a time,
parameters of the track, or Inserts, or send effect, or Eq's, or
channel strips. It would be fairly useful to have several tools simultaneously at one mouse click
,wouldn't it ? Easy, click on the button opening each group
but hold the CTRL key, and here it is ! For the greedies,
with the ALT key, the groups are all opened or closed with a single click,
38-inch screen in 2560 x 2048 points suggested ;o) Otherwise, you can't see it
all !
By default, the Inspector displays only a single parameter group at a time,
parameters of the track, or Inserts, or send effect, or Eq's, or
channel strips. It would be fairly useful to have several tools simultaneously at one mouse click
,wouldn't it ? Easy, click on the button opening each group
but hold the CTRL key, and here it is ! For the greedies,
with the ALT key, the groups are all opened or closed with a single click,
38-inch screen in 2560 x 2048 points suggested ;o) Otherwise, you can't see it
all !
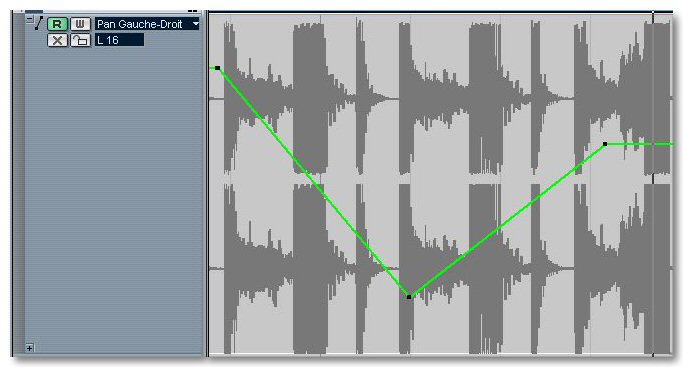
Well lined up, you automation !
While we are talking about the magical modifier keys... When you draw an automation with the Draw tool, the obtained line contains many points, according to what you drew. If you want to obtain just a nice straight line with two points only, do the same thing but with the SHIFT key held down. Et voilà ! The fully linear fader movement is yours !
See ya soon, here or somewhere else ,o)