


Cubase SX Tips and Tricks #2

Those tips and tricks were first written for Keyboards / Home Studio magazine. They are published here with their kind permission, thanks ,o)
"Humanized" snare drum
If you absolutely want your project to sound like a bad Midi file, here is a tip: leave the second and fourth snare-drum hits (it is an example!) set on a velocity of 127 ! Nothing is more unpleasant than a completely linear drum sequence.
I suggest you a nice little method to obtain velocity variations, even if you unashamedly copy a small "part" fifty times!
To achieve this, we are going to use an (mistakenly) unknown tool: the Logical Editor. It allows you to modify Midi events as a computer program would do it : if one condition and/or another condition is/are fulfilled, then one process is applied.
So, select the Midi part to be processed and choose Logical Editor in the Midi menu.
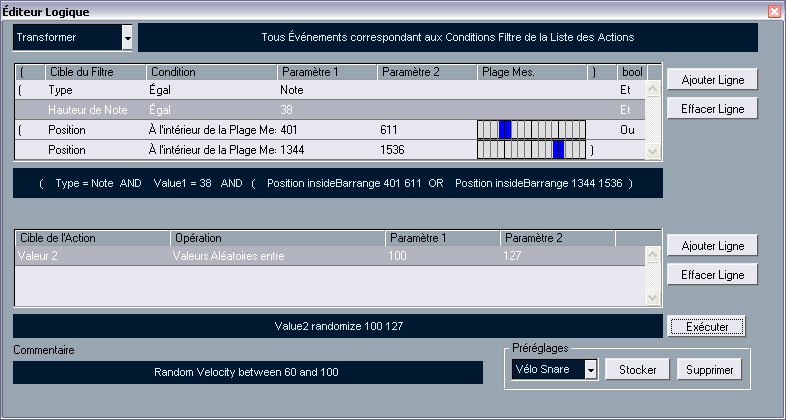
Make all the settings as indicated on the image, click on Add Line, which, well, is going to add a line (incredible!). Then choose the possible values in the pop-up menus showing up as soon as you click on a value. Be careful to respect the square brackets as well as the OR ant the AND. Concerning the two Position conditions, do not forget to select the two portions which are before and after the second and fourth beats.
What does this strange language mean ? Translation : Dear Cubase, if the Midi event you found is a note, and if this note is a D38, and if it is around the second and fourth beats, please be kind enough to give it a random velocity between 100 and 127, thanks in advance...
As Cubase is not perverse, he will obediently execute this demand.
So as not to lose this setting, click on Save and give it an explicit name, you will be able to use it again just as you like!
Files in the Rex style
You know the principle of the Rex files: cutting Audio files in small slices and time-stretching them according to the space between each slice. Cubase SX has functions allowing you to do this yourself !
Tutorial class : Import a drum loop on an audio track. Double-click on the event to open the Sample Editor. In the editor; activate the Marker Mode function. Cubase will detect eack peak and put a marker on it. The detection sensitivity can be modified with the slice sensitivity slide.
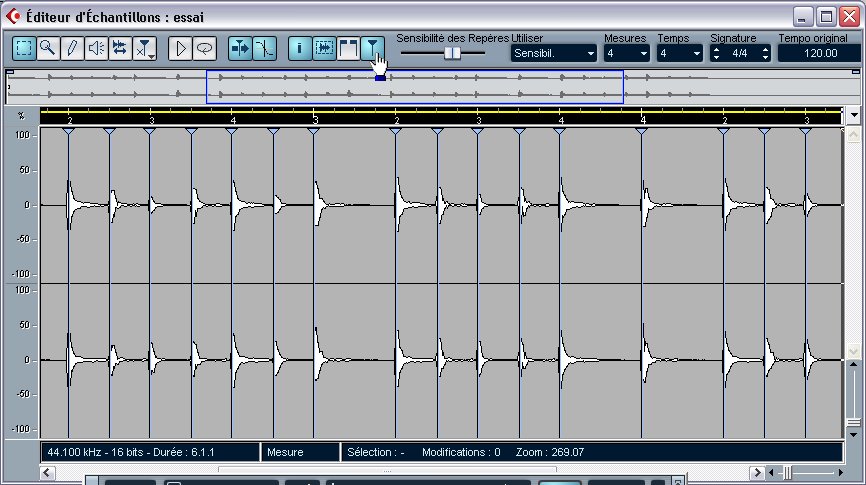
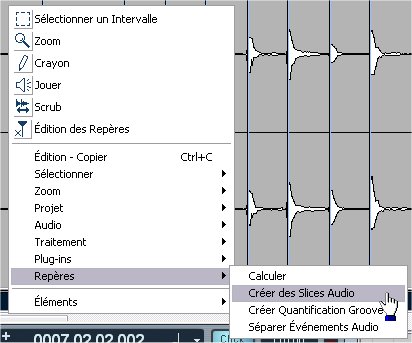
Then choose in the top of the window the number of bars or the number of beats that the loop will have to last. Then, apply Create audio slices that you will find by right-clicking in the Marker sub-menu.
SX will then cut the audio file on every marker and calculate the space between each element in order to obtain what you will have chosen above. Even better, if you modify the project tempo, this space will be modified accordingly, to fit the chosen tempo.
If the chosen tempo is slower than the initial loops one, Cubase will have to insert blanks between the slices. The result might be more or less satisfying depending on the case, with blanks being too obvious. Here again, there is a tip: right-click, audio sub-menu, apply the reduce the empty spaces function. SX will then time-stretch each element in order to fill in the blanks. Obviously, this is to do if we are certain that the project tempo will not be modified anymore.
See ya soon, here or somewhere else...