


The Key Editor
You're here : Cubase >Learning

Once upon a time there was a small young guy that took over a tracker for his Amiga 500 et started fooling around? I'll pass over the adolescence steps that are worth a whole page ;-)
Step by step things were going further : a few years ago, I bought an expander and started composing with Bars&Pipes (which still doesn't have its equivalent on PC, especially for such a price ;-)). My keyboard being a bit old (PSR50 ! Isn't it still searched for ?) and without a sensitive touch, I'm quickly getting used to directly work inside the editor instead of playing on the keyboard, since one must take everything again by hand anyway.
Then to work on audio one must invest again, and choose a PC (a bit forced to). There it was, the 1st PC with an SBLive ! and the small Cubasis AV.
CSince one can hardly change its habits, I'm still manually composing with Cubase, furthermore my keyboard is installed in an elevated position which isn't practical to play, but that avoids dust to fall over the music equipment below ;-)
The Key Editor is the one which seems to me the most adequate to directly work with : it's rather intuitive and allows a good view of what one's doing. This description is only very short, you'll see ;-) everything isn't detailed, it's just made to let one find himself when first starting.
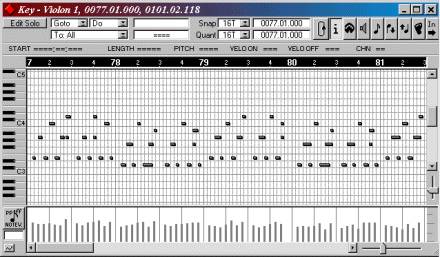
The Key Editor Window
Down on the right : easy, the scrolling bars and another bar which determines the zoom factor...
The window's main part
It represents a grid on which the notes are represented.
- Pitch : defined by the vertical position of the stick on the grid (and visible on the keyboard located on the left)
- Duration : defined by the length of the stick
- Velocity : defined by a vertical bar located below the note in the lower part of the window.
The window's upper part
It contains several boxes :
 Determines which notes will be affected by the manipulations done
 I really have some problems on that one to understand what it's used for, but like a japanese sentence says : If You Dunnowat Its Youzdfor, Youll Not Youzit ;-)(very funny in french !)
  The "Action" checkbox : the Fill function will, as it says, fill up the Part with a series of notes, all at the same pitch (at my place it's Mi-2, but I don't know how the default note can be changed), placed according to the Resolution, and with a length determined by the Quantize. The Delete function will simply delete everything that resides in the active part (Beware with that function, there's only one Undo level ! )
 Determines the default space between 2 created notes : the notes will automatically be placed on the closest position that matches a multiple of the value.
 Determines the default length of the newly created notes
 The 2 next boxes are the entry and exit points of the local loop.
There are also plenty of buttons, aaaahhh, adolescence ;-)
 Activates or deactivates the local loop, allowing to play in a loop a selected portion (by the values on the left) of this track while the remaining of the song plays normally. Shit, it's easy when one has understood and it's fucking hard to explain ! There's only one way, do the same as me, just try
 Enables or disables the information line
 Allows to correct certain parameters of the selected note through the midi keyboard and is used in conjunction with the Note pitch, Note Velocity ON and Note Velocity OFF buttons
 Allows to listen to the notes while you create them with the pencil. I still wonder why this button isn't activated by default, it's so practical. You can thank it, as well as FeedBack moreover, they are at the origin of this page ;-)
 When the midi button is activated, the selected note will take the pitch of the note played on the keyboard. The button Note Velocity ON : when the Midi button is activated, the selected note's pressure velocity will be replaced by the one from the note played on the keyboard
 When the midi button is activated, the note's release velocity will be replaced by the one from the note played on the keyboard
 Allows to record notes from the keyboard (Midi), one after the other : each key pressed will create a note (of the correct pitch, of course), at the location where the play locator (big vertical bar) is and of the length defined by the Quantize box, then the play locator will shift to the right of the space defined by the Resolution box
 Allows, when one creates new notes, to shift everything that follows to the right (of the value defined by Resolution)
 Allows to choose the type of colouring of the notes and values of the controller (according to the velocity, note pitch and midi channel or part).
And finally, between the buttons and the main window part, there's the information line, that indicates different parameters about the selected note (and nothing if several notes are selected) and allows to modify them manually.
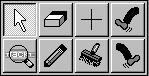
The Toolbox
Open through the right mouse button, it proposes :
- The arrow : allows to select an event (or more through Shift-clicking them one after the other, or through drag-selection) and shift it (them)
- The eraser : allows to delete events
- The pencil : allows to create events. The click creates a note, the length can be set up through shifting the mouse horizontally without releasing the button. And Philippe HELLOUIN adds : "the ALT key allows to limit the pencil to the modification of an existing note, very practical to avoid creating notes, while one only wishes to improve the note entered from the keyboard". Thanks Philippe !
- The Brush : paints notes : how come ? of course, the Cubase doc is very picturesque ;-) The best is to try to paint : one creates notes in series without releasing the mouse button), always at the same pitch (unless you maintain the ALT key pressed), and whose length and space are define respectively by the Quantize and Resolution values (Who said it wasn't explained better than the doc ?)
- The magnifying glass : allows to listen to notes on which one clicks
- The cross : is used in the lower window part to align values of the controller (i.e. to make them follow a linear curve (it isn't funny, who's laughing ? Of course a curve can be linear !).
Well this is it for the moment, that makes it look a bit like a catalogue, but I hope that it will help some to locate themselves more quickly and easily.
Geyser, on the 14-03-1999
Page viewed 18546 times