


BFD tutorial

This tutorial was originally written for Musicrun magazine. It's reproduced here with their kind permission ...
BFD Special
Sofware editors are making us really lucky in terms of drum simulation. It's getting easier and easier and possible to produce pre-mastered or even finalized songs with amazingly true-to-life drum lines. The latest to arrive on the market : BFD from Fxpansion. Frightening audio quality and easy programming, let me introduce you to one of the numerous programming methods.
Using BFD with a sequencer
BFD may be used in several ways : As a standalone software, as a simple sound module or as a user-definable rythm machine. I'm going to detail the latest way to handle it. Summary of what follows : Loading of the plug, creating a user defined kit, choosing patterns, programming the sequencer, audio adjustments of every drum parts separately, and finally global mixing. I chose Cubase SX 2.01 as the host but this step by step tutorial may be applied to any sequencer with a built-in drum editor or piano roll. Before you start, I strongly advise you to download the latest update. It fixes several bugs but also offers a few additional "Grooves" ...
|
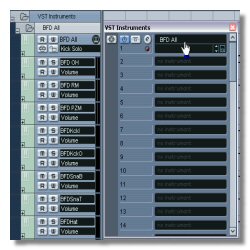
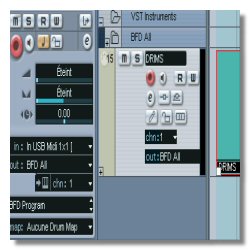
Load BFD into your favourite
sequencer and organize the environment. Watch out, BFD offers
3 different versions but use preferably «BFD All» which
enables a lot more mixing possibilities. I'll come back
to that later. Under Pro Tools, the only available option is Stereo.
|
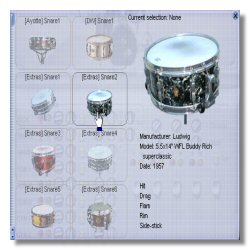
Next, we'll choose the drum parts
one by one. Click on the left icons and then click on the available
sounds with the SHIFT key to get a pre-listening to it. Finally,
select the right sound according to your needs. Repeat the process
for every drum part. Now you get a fully working drum kit.
|
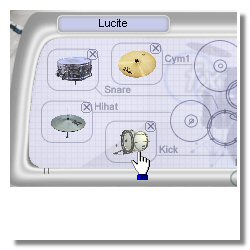
By clicking on the drum sketch,
you gain access to an interface that allows on the one hand to
listen to the selected sounds with velocity nuance but also on the
other hand to erase unused parts. Working that way frees up the
amount of RAM dedicated to BFD and it badly needes some !
|
 |
 |
 |
|
Saving the presets of your kit will
be usefull to reuse it in another song project. 2 floppy-like buttons
are displayed to make the savings and Kit loading easier. Save the Kit
into the «User» folder as suggested. This way, it will be
available by clicking the Kit Selector. |
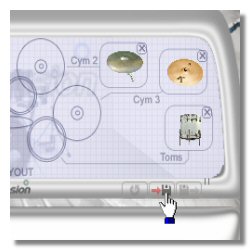
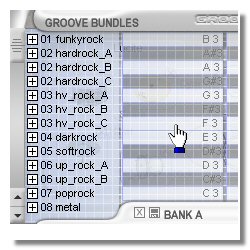
On the upper right, disable all
R, S and F buttons. Click now at the top on
Current Groove. Here we're going to select and load the
Patterns. On the left the Grooves in themselves and
on the right the Fills. We've got 24 Groove-squares and
12 Fill-squares. |
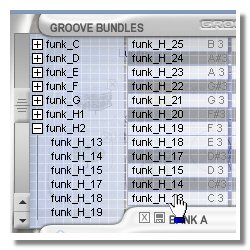
You can load a whole
Bundle by "drag and drop" or, by clicking the little +
displayed in front of it, select a specific Groove. No
matter how the square you drop them into. Clicking on a
Groove allows to listen to it. Select that way your
Grooves and Fills.
|
 |
 |
 |
|
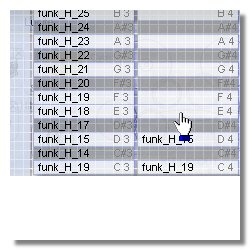
There's a usefull trick to move a
Groove from one square to another. Hold the CTRL
key while "drag'n dropping". It's worth noting that a
Groove may also be used as a Fill and vice versa.
Selecting Patterns is the longest operation to carry through a
succesfull conclusion. |
Now add a new Midi track into your
project, create an empty Midi Part and open it in the Drum editor
or the Piano Roll. You've certainly noticed that any Groove/Fill in
BFD is associated with a note, haven't you ? Then you can imagine
the rest ! But first of all, some usual precautions ...
|
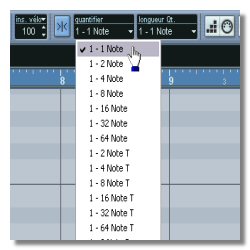
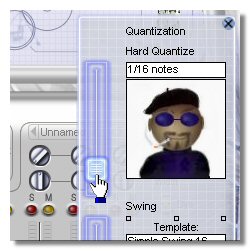
BFD requires a metronomic
precision as for the notes position that will trigger the
right playing of a Groove. To be free of worries I usually
adjust the editor's quantization to 1 note and the
note length to 1 note too. Otherwise, I can't
guarantee success ! |
 |
 |
 |
|
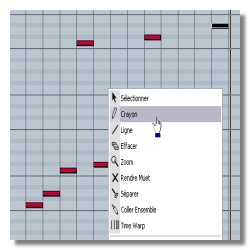
You just have to add note after note
in the editor so as to build up a worthy of the name drumline.
To do this, use the pencil (Cubase SX) or the equivalent and enter the
right note at the right place. It's not so difficult ! I'm even getting
on it ! |
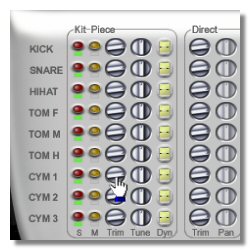
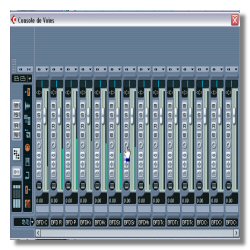
You can adjust at any time the sound
of any part from the drum kit. The Trim buttons allow to balance the
equilibrium between the mics putted close to the instrument and the
overheads. The whole thing acts finally as an auxiliary send effect.
It's frighteningly efficient ! |
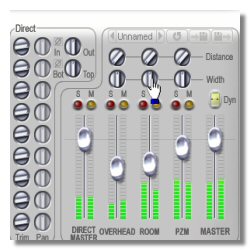
Also use the faders to balance the
direct sound and the sound coming from the 3 ambiant recordings. With
his options and those from the previous step, you've got all what you
need to make your drum sequence sounding amazing enough to drive any
decent sort of drummer completely mad ;o) I've tried it out !
|
 |
 |
 |
|
Better ! BFD offers an audio output
per each element of the Kit and also per mics groups. So, it's
possible to process each sources differently : Reverb on the snare,
compression on the kick, equalization on the over heads etc ...
Raring to go computer required ! |
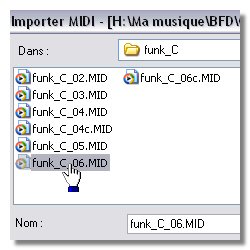
Unfortunately, BFD don't have any
virtual Midi output like Groove Agent. If you want to edit patterns,
there's only one tedious solution : Go on your hard disk and recover
the Midifiles then import them one by one into your project.
A bit predictable, isn't it ... ? |
That's all folks ! Not so difficult,
don't you think ? I drop you off at the reading of the manual to fine
tune your settings, among other those active on the playing
irregularities (timing and velocity). With all that, you would be able
to produce realistic drum parts. See you here or somewhere else ;o)
|
 |
 |
 |