


The Mixer Section (VST)

The first thing to do when we have several recorded tracks is to set their respective level. For this we will use the Cubase VST Mixing Board . Off we go, Audio/Monitor menu. . Actually, yours might look fairly differently from this one indeed !
Because the size of this board is modifiable at will. For this purpose, move your pointer near the edge of the board, right or left, and when the pointer turns into two "back to back" arrows, keep the mouse button down and drag it to resize the mixing board. Come on, next ! next ! and next ! OK, OK, when asked like this...
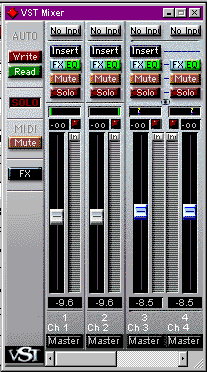
Let's tour the whole mixer section now. First and foremost the faders. They are used for adjusting the output level of the track. Just click on them and drag them up or down. Above and below there are numbers. The upper ones, like when recording, show the highest level reached at output of the track. If the red LED lights up, then the output level is too high and the audio "clips" (gets digitally distorted). Click on the LED to reinitialize it.The lower numbers correspond to the correction the fader makes to the level of the track itself. Oh dear, what is this guy saying??! OK, if the maximum level of your track is -2dB, with a fader showing a zero lower value, the output level will not be increased or reduced and the maximum output will be at -2dB, as shown above the fader, not 0dB as shown below! Hmm, I'm not even sure I understand what I'm saying myself... Then let's check it out further button by button :
-
 Allows to switch on or off monitoring from within Cubase. It is only usable if your sound card has an ASIO 2 driver. Otherwise, latency (delay between sound coming in and sound coming out of Cubase) will be much too high for any practical use.
-
 Gives access to a a rack of effects. Don't mistake that for Aux sends effects that we will see later on. Here, all the signal is going through the effect while with the Aux sends effects , the original signal and the processed sound can be mixed together.
-
 Adjusts the "Panning". That's the position of the sound in the stereo space. Move around the small green cursor. Voila !
-
 There we touch on a very important aspect of Cubase VST : the effects and the eq section. When clicking on this button, you open a window which is in fact a more detailed view of the selected mixer channel. There we can find 4 to 8 Aux sends effects (depending on the installed version of Cubase) and 4 parametric equalizers.
-
 If you want to silence one track, click on this button !
-
 "Mutes" all the other tracks. A piece of cake !
-
 Yet some more stuff coming directly from the professional studio techniques: we will be able to record all movements of the buttons, faders, effects, equalizers, etc... You click on the Write button, play the song, adjust the settings as desired.Then you click on the Read button and there it is, incredible, you see the movements of the buttons and you hear all applied settings as you recorded them during the previous step. That is called automation.
-
 "Mutes" all the Midi tracks. No comment !
-
 Again a very beautiful toy ! The (Aux send) rack of effects. . A thing to make all guitarists of the creation turn crazy... Me in first ! Depending to the installed plug-ins, you will be able to add to your tracks reverb, echo, chorus, distorsion, clicks as heard on vinyle records, and some more icing on the cake.
Here you should have enough to keep you busy for a while.Try everything, you will quickly find out that things are a lot simpler than they look like.The next episode is called Ze VST channels Settings (with some French accent). Until then, stay tuned !