


"Ze" VST Channel Settings

As an image is more explicit than any lengthy speech, let's first have a look at what we're talkin' bout. Ladies (by the way, it'd be nice to have some with us !) and Gentlemen, let me introduce you the VST Channel settings.
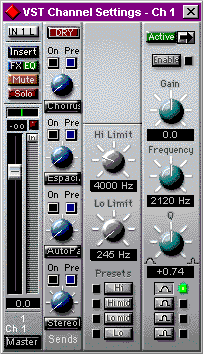
The left section of the puppy has already been discussed so let's have a look to the right section. Do we work it out button by button ? Shall I do all the screen captures ? Ok , just because I like you.
-
 Deactivates all effects. Ideal for A/B-ing one track w/ or w/o the effects.
-
 When the On button 'on' button is lit, will make the sound going thru the effect that we'll choose later on. The Pre button, has got a radical action. On the Off position, the sound level sent to the effect will depend on the Fader's level. On the 'on' position, the signal will be sent directly to the effect , totally independant from the fader's postion.
-
 Ok, here all depends on what you've got installed on your computer. Have you ever heard of those famous Plug-ins ? Here you will choose what effect to apply on this track: distortion, reverb, echo, chorus, flanger or whatever.
-
 This button determines the level of the signal that will be sent to the effect. Do not be too brutal with it. If you hear cracklings, the effects is overloaded. Yes my guitaristic friends, Cubase (and digital audio in general) is not a Marshall ! Try out the fuzz box bundled with cubase and you shall understand what I'm afraid to talk 'bout. Oh well...
You can apply up to 4 (or 8) effects by track, well all depends on your computer. That's all for the effects section. Let's do the same thing for the Equlisation ? Big section, but let's go. We're not going to make a lecture on equalisation theory, you just have to know that these are "bass/treble" knobs, of a more sophisticated kind.
-
 First, the little arrow. It allows you to open and close the 4 EQ modules. It's to be fitted on how many modules you're using so as to save space on your screen. The Enable button activates or deactivates the module.
-
 It ain't gonna be easy to clearly explain this thingie. Ok! A parametric equalizer runs on 3 knobs. One for the central frequency, one for the Q factor factor that determines the bandwidth on which the filter will act, and the last one, Gain to boost or cut those frequencies. In cubase VST it's kinda like the same but we ain't got 3 but many more buttons. So, so, so... The Hi Limit and its little brother Lo Limit will determine the frequency limits of the Frequency buttons that we'll see further. The "Lo" acts on the bottom frequency and the "Hi" is for the top frequency. Try it out and you'll get what I mean.
-
 If you're too lazy to configure the Hi & Lo limits, use the Presets. These are ready made patches. You've got choice between some presets which will act on bass, lo-mid, hi-mid or treble.
-
 Man, this one is easy! All has been said, with this tiny thing, we can select the frequency to be treated. You'll see that the minima and maxima are respectively equal to Lo and Hi limits... How well do I speak !
-
 This one will cut or boost the choosen frequency. It runs from -12dB to +12dB.
-
 Here's one that has already been the subject of many jokes (well in French at least, where Q phonetically bears a somewhat specific meaning). It will act on the bandwidth around the central equalisation frenquency. As for Hi & Lo Limit there are presets that are from soft to hard.
-
 Just one thing. For all knobs, you can enter the value by hand by clicking on it. It's true that using the mouse to make fine settings is a hard job.
Equalization is a full time job. It's one of the most powerfull tools to get a good mix. Instead of pushing the fader of a track that seems to be odd, test all the possible corrections and see if while boosting (or more often cutting) a sensitive frequency you can push this instrument to heaven. That's all folks for tonight. We made a great job! Didn't we? Well, it's a real pleasure to prepare those pages for you. I insist. The next one is already hanging around in a remote corner of my poor little head. Will be out soon! So stay tuned !